Monitoring Docker Containers with AppDynamics
As more organizations break down their monolithic applications into dozens of microservices, monitoring containers is more important, and complicated, than ever. Fortunately, AppDynamics has built Docker Monitoring to give you end-to-end monitoring for all your Docker containers. This allows you to immediately know when you have containers that are causing resource contention issues. This can also help you solve infrastructure-related issues with your containers dynamically. You can see below how AppD gives an overview of your running containers and details into each of them:
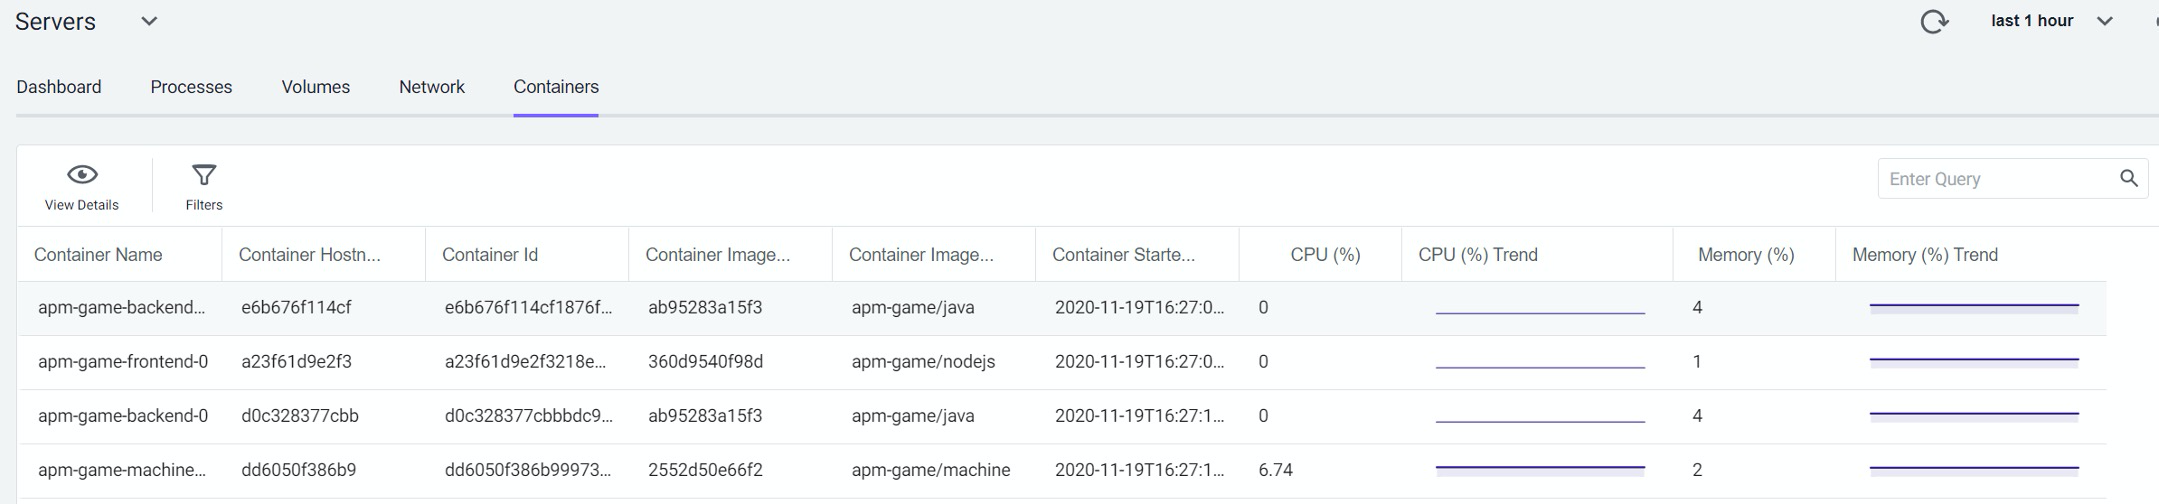
The list of running containers
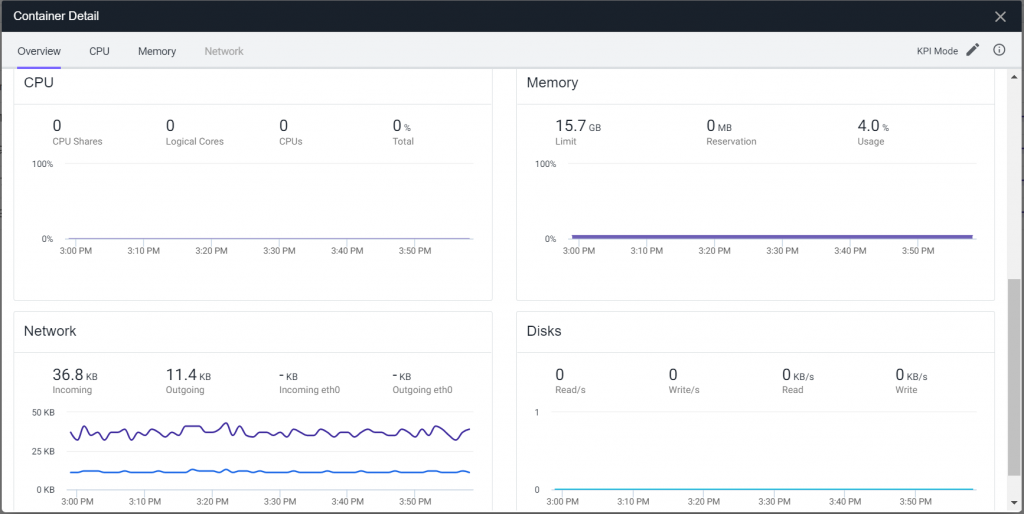
Container Insights

This information is invaluable, but when searching through AppDynamics documentation, it can be confusing to understand how to set up container monitoring. Making this even more challenging is the provided AppDynamics images, as of this time, are not up to date with the current agents. Evolving Solutions recognizes this problem and has addressed it by automatically building new Docker Images when new AppDynamics Machine Agents are released. If you would like to use our images, you can find our repo here. Otherwise, if you’d like to build your own image of the agent, continue reading on.
In this blog, I’m going to walk you through the process of creating your own Docker Image to run the AppDynamics Machine Agent. When you run the image as a sidecar to your Docker containers, it will provide:
- Infrastructure Information for your containers, such as
- Container metadata
- Tags
- Name-Value pairs derived from Docker/Kubernetes
- AWS tags where applicable
- Infrastructure health insights, such as CPU, memory, network, and disk usage
Prerequisites
- Container monitoring requires a Server Visibility license >=4.3.3, for both the Controller and the Machine Agent.
- AppDynamics recommends that you use Docker CE/EE 17.03 or Docker Engine 1.13 with this product.
- Container Monitoring is not supported on Docker for Windows, or Docker for Mac.
- Server Visibility Enabled – Enable Server Visibility – Shown in sample docker file below (1.1)
- Docker Enabled – Enable Docker Visibility – Shown in sample docker file below (1.1)
Creating the Dockerfile
- Download Machine agent installer for Linux with bundled JRE and unzip and then rezip it as machine-agent.zip. This can be done here: https://download.appdynamics.com/download/.
This is important, sometimes the zip from the download is not read properly to create the folder structure. Do this on the machine where the docker image will be run.
- Create a directory named MachineAgent on your machine where you will run the docker instance. e.g. /Users/<username>/Docker/DockerVisibilty/MachineAgent. (Or to any directory of your choosing)
- Copy the machine-agent.zip to this location.
- Create a new file called Dockerfile with the following code and give 744 permission:
# Sample Dockerfile for the AppDynamics Standalone Machine Agent
FROM ubuntu:14.04
# Install required packages
RUN apt-get update && apt-get upgrade -y && apt-get install -y unzip && apt-get clean
# Install AppDynamics Machine Agent
ENV APPDYNAMICS_HOME /opt/appdynamics
ADD machine-agent.zip /tmp/
RUN mkdir -p ${APPDYNAMICS_HOME} && unzip -oq /tmp/machine-agent.zip -d ${APPDYNAMICS_HOME} && rm /tmp/machine-agent.zip
# Setup MACHINE_AGENT_HOME
ENV MACHINE_AGENT_HOME /opt/appdynamics/machine-agent
#Comment this section only if you are using docker-compose to build/run the machine-agent container
ENV MA_PROPERTIES "-Dappdynamics.controller.hostName=<<ControllerHost>> -Dappdynamics.controller.port=<<ControllerPort>> -Dappdynamics.controller.ssl.enabled=false -Dappdynamics.agent.accountName=<<accountname>> -Dappdynamics.agent.accountAccessKey=<<accesskey>> -Dappdynamics.sim.enabled=true -Dappdynamics.docker.enabled=true -Dappdynamics.docker.container.containerIdAsHostId.enabled=true"
# Include start script to configure and start MA at runtime
ADD start-appdynamics ${APPDYNAMICS_HOME}
RUN chmod 744 ${APPDYNAMICS_HOME}/start-appdynamics
# Configure and Run AppDynamics Machine Agent
CMD "${APPDYNAMICS_HOME}/start-appdynamics"
Depending on how you are building and running the machine-agent container in docker (i.e. via docker-compose or docker build/docker run), you’ll need to comment/un-comment the portions in the file. This script will set the AppDynamics specific environment variable needed for the MachineAgent and execute the machineagent.jar file.
5. This docker file will:
-
- Use an ubuntu:14.04 base image (you can use any base image you want)
- Install the unzip package
- Copy the machine-agent.zip to the /tmp directory of the image
- Extract the MachineAgent artifacts to /opt/appdynamics/machine-agent/
- Clear up the /tmp directory
- Copy the MachineAgent startup script called start-appdynamics onto /opt/appdynamics/machine-agent/ directory
- Run the script
Note: we are using our own controller parameters in MA_PROPERTIES environment variable in the Dockerfile. You’ll need to use your own controller information in this environment variable.
Creating the Docker Start Script
- Create another file called start-appdynamics in the same MachineAgent folder with the following:
#!bin/bash
# Sample Docker start script for the AppDynamics Standalone Machine Agent
# In this example, APPD_* environment variables are passed to the container at runtime
# Uncomment all the lines in the below section when you are using docker-compose to build and run machine-agent container
#MA_PROPERTIES="-Dappdynamics.controller.hostName=${APPD_HOST}"
#MA_PROPERTIES+=" -Dappdynamics.controller.port=${APPD_PORT}"
#MA_PROPERTIES+=" -Dappdynamics.agent.accountName=${APPD_ACCOUNT_NAME}"
#MA_PROPERTIES+=" -Dappdynamics.agent.accountAccessKey=${APPD_ACCESS_KEY}"
#MA_PROPERTIES+=" -Dappdynamics.controller.ssl.enabled=${APPD_SSL_ENABLED}"
#MA_PROPERTIES+=" -Dappdynamics.sim.enabled=${APPD_SIM_ENABLED}"
#MA_PROPERTIES+=" -Dappdynamics.docker.enabled=${APPD_DOCKER_ENABLED}"
#MA_PROPERTIES+=" -Dappdynamics.docker.container.containerIdAsHostId.enabled=${APPD_CONTAINERID_AS_HOSTID_ENABLED}"
# Start Machine Agent
${MACHINE_AGENT_HOME}/jre/bin/java ${MA_PROPERTIES} -jar ${MACHINE_AGENT_HOME}/machineagent.jar
- Give appropriate read/write permissions for the file (i.e. 777)
Creating the Docker Build Script
Create a script called build-docker.sh in the same MachineAgent folder with the following:
docker build -t appdynamics/docker-machine-agent:latest
Note: This file also needs appropriate read/write permissions. If you use docker-compose then this is not needed.
Creating the Docker Run Script
Create a script called run-docker.sh in the same MachineAgent folder with the following:
docker run --rm -it -v /:/hostroot:ro -v /var/run/docker.sock:/var/run/docker.sock appdynamics/docker-machine-agent
Note: Give appropriate read/write permission to this file. Again, if docker-compose is used this is not needed.
Build and Run the Image
To build the image run ./build-docker.sh and then to run the docker image run ./run-docker.sh
Docker-Compose
If you wish to use docker-compose, create a file docker-compose.yml in the same MachineAgent directory and the following code.
version: '3'
services:
docker-machine-agent:
build: .
container_name: docker-machine-agent
image: appdynamics/docker-machine-agent
environment:
- APPD_HOST=<<CONTROLLER HOST>>
- APPD_PORT=<<CONTROLLER PORT>>
- APPD_ACCOUNT_NAME=<<CONTROLLER ACCOUNT>>
- APPD_ACCESS_KEY=<<CONTROLLER ACCESS KEY>>
- APPD_SSL_ENABLED=false
- APPD_SIM_ENABLED=true
- APPD_DOCKER_ENABLED=true
- APPD_CONTAINERID_AS_HOSTID_ENABLED=true
volumes:
- /:/hostroot:ro
- /var/run/docker.sock:/var/run/docker.sock
Use the commands docker-compose build and docker-compose run to build and run respectively.
Automation
Would you like to learn how Evolving Solutions used the steps above to automate the build and deploy of newly released AppDynamics Docker agents? Look out for our upcoming blog posts!
Getting started with AppDynamics
If you don’t have an AppDynamics account, you can start your own free trial here.
After you’ve created your account, you can visit AppDynamics’s University to view hundreds of bite-size videos covering all things AppD.